Technical Manual
Adding API endpoints to the Little Endian
To add a new endpoint to the Little Endian first you have to define the event in Settings.h
After that you can call your custom code/function in the Little-Endian.cpp file that you want to run when the Little Endian receives the previously defined event from the socket server. You have to add the event to the if/else list int the switchActions function like this://All defined actions, we check which event and will trigger this event over here
void switchActions (String event, int action){
if(event == EVENT_CUSTOM){
yourCustomFunction(action);
}
}
Dont forget to add your new events to the API documentation in the readme.md
| Event | Parameters | Description |
|---|---|---|
| customEvent | (optional)parameter | Describe what happens when you call your custom event |
Adding new blocks to Blockly
To add a block to Blockly first you have to define a block in src/components/BlocklyComponent/BlockDefinitions.js
const customBlock = {
    name: 'customBlock',
    category: 'categoryName',
    block: {
        init: function () {
            this.jsonInit({
                "type": "customBlock",
                "previousStatement": null,
                "nextStatement": null,
                "colour": 180,
                "tooltip": "Execute custom function",
                "helpUrl": ""
            });
        },
    },
    generator: (block) => {
        return '\ncustom("customEvent");';
    },
};
You can find more info on how to build a custom blocks and what the fields mean here.
At the bottom of the file you still have to add your new block to the blocks object.
let blocks = {turn, move, shoot, reload, reset, turnHolder, turnElastic, face, moveServo, number, ldr, customBlock};
tools = {[
  blocks.turn,
  blocks.move,
  blocks.shoot,
  blocks.reset,
  blocks.reload,
  blocks.turnHolder,
  blocks.turnElastic,
  blocks.customBlock,
]}
Finally you have to add the function you called in the generator of your block to the public/worker.js file.
This is the function that will be called when running the code from your custom block and it will send an event to the Little Endian through the socket server.
Running the web app and socket server in Docker
First you have to download and install Docker Desktop on your machine. You can get Docker here.
In your command line tool go to the root of the project folder where the docker-compose.yml file is and run the command:
Both the web app and the socket server should now be running, you can check this by going into your desktop Docker application, it should look like this:

From now on you can also stop and start the container from Docker Desktop by pressing the start button.

Hosting the web app on Microsoft Azure
Before you start you need to have an Microsoft Azure subscription (free for students) and Visual Studio Code installed on your computer.
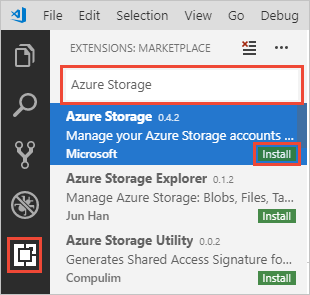
First you will need to install the Azure Storage extension in VS Code and sign in when asked.

Then you need to create a Storage Account by right-clicking on Storage Accounts in the Azure tab.

Enter the name for your Storage Account and select a location for the storage.


After waiting for a bit you will see the success message in the activity log.

Before being able to deploy the web app to the Storage you will need to create a build of the web app. Navigate to the web app folder and run:
This will update or create new build files in the ‘build’ folder which you can deploy. Open the web app folder in VS Code and right-click on the ‘build’ folder, then select ‘Deploy to Static Website via Azure Storage’.
Then you will need to select your subscription and the Storage you just created.


When it is done deploying you will see a pop-up in the corner telling you the url to your deployed code.

You will also be able to see your created Storage and Static Website in the Azure Portal under Storage Accounts. If you want you can add a custom domain and/or change some settings for your Static Website.
Hosting the socket server on Microsoft Azure
Before you start you need to have an Microsoft Azure subscription (free for students) and Docker installed on your computer.
First you will need to create an image of your Docker files. Make sure Docker is running and enter in your command line tool:
After it’s done building you need to push the image to the Docker Hub.Then you go to the Azure Portal website, navigate to services and click on App Services. Then click on create to create a new App Service.
Fill in the form.

Create a new App Service Plan if you don’t have one already.

And click change size and select F1 to select the free tier. You can always upgrade later to a paid tier if needed.

Click ‘next’ and enter the Docker info for your image.

Then you just click ‘next’ until you get to the ‘Review + create’ page and create the App Service. Once it’s finished deploying you can click on ‘Go to resource’ and click the URL under ‘Essentials’ to visit your deployed Docker image.